07/06/2026 20:45:47
Firebase Channel Description
[info] Precaution Firebase needs to run in Android 4.0 and higher device
Note: Bugly and Firebase both have crash monitoring functions and are not incompatible to each other, so they cannot be accessed at the same time
The device needs to install Google Play Sevices 11.0.2 and higher versions
I. Developer Platform Configuration
1.1 Register Project
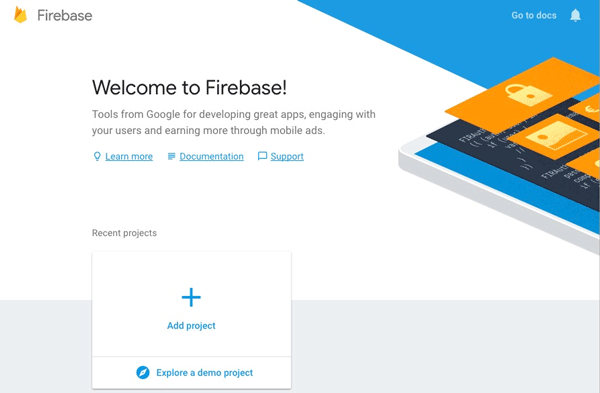
In Firebase Console page to register the project, and complete FireBase project registration according to prompts
1.2 Register App
1). In Firebase console's homepage (Project Overview), add the corresponding platform's FireBase app:
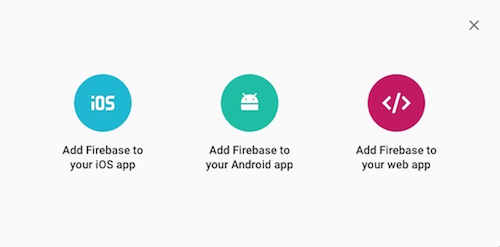
2). And add the corresponding information according to prompts
3). Register Android app
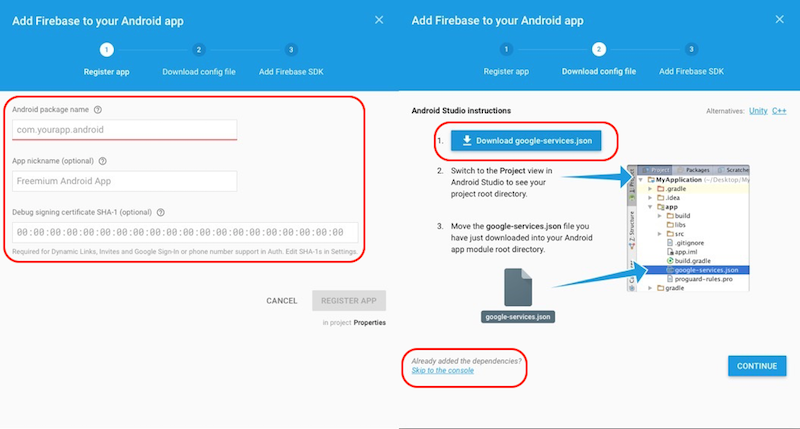
- After filling in information, register App. If some fields are not confirmed, they can be added later in the settings
- Download configuration json file, used for future use. It can be also downloaded later in the settings
- Skip other steps
4). Register iOS app
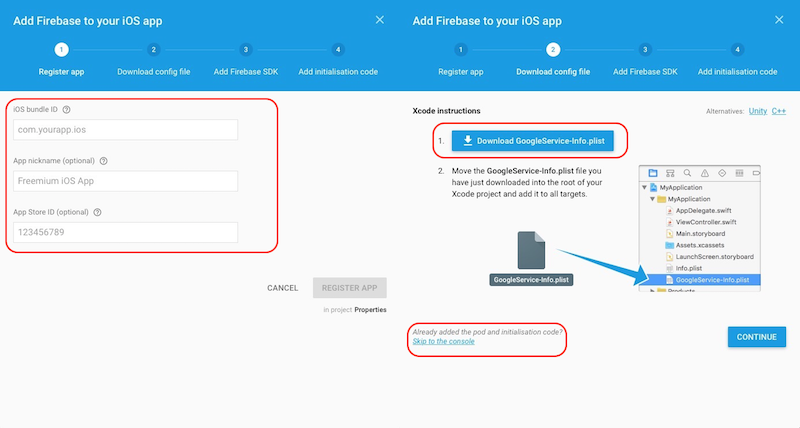
- After filling in information, register App. If some fields are not confirmed, they can be added later in the settings
- Download configuration plist file, used for future use. It can be also downloaded later in the settings
- Skip other steps
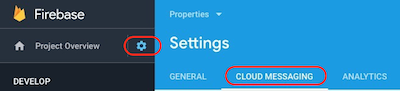
1.3 Upload iOS APNs Certificate
1). In the project Settings page's Cloud Message Transfer menu, find the iOS project
2). Upload Development certificate and Production certificate
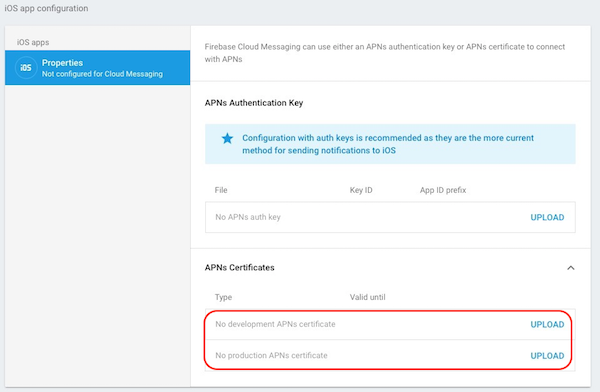
For more information, please refer to Google FireBase documentation description :
https://firebase.google.com/docs/cloud-messaging/ios/certs
II. AndroidProject Configuration
2.1 Configure the google-services.json file
1) Gradle packaging method
The gradle packaging method supports reading the content directly from the google-services.json file and converting it into the corresponding configuration file (app/build/generated/res/google-services/{build_type}/values/values.xml). Refer to the instructions of the official website https://developers.google.com/android/guides/google-services-plugin to make relevant configurations, as shown in the following steps:
- Add the
google-services.jsonfile
Place the google-services.json file into the root directory of your project.
- Add the following code in the project's
build.gradlefile
apply plugin: 'com.google.gms.google-services'
// ...
dependencies {
    classpath 'com.google.gms:google-services:4.2.0'
    // ...
}
2) Handle FireBase json File Configuration
According to google-services.json file generated by Firebase official website, modify string configuration in /res/values/strings.xml file in MSDK FireBase resource project msdk-push-firebase-2.xx (xx is the sub-version number) directory:
<!-- All can find the corresponding values in google-services.json -->
<string name="gcm_defaultSenderId">{project_number}</string>
<string name="firebase_database_url">{firebase_url}</string>
<string name="google_storage_bucket">{storage_bucket}</string>
<string name="google_app_id">{mobilesdk_app_id}</string>
<string name="google_api_key">{current_key}</string>
<string name="google_crash_reporting_api_key">{current_key}</string>
<string name="default_web_client_id">{other_platform_oauth_client: client_id}</string>
Note: The compiler can automatically fill in the 'com.crashlytics.android.build_id' field, so you do not need to pay attention to it.
(1)Project configuration
gcm_defaultSenderId is a number, which corresponds to project_number in json file
firebase_database_url is URL link string, which corresponds to firebase_url in json file
google_storage_bucket is string, which corresponds to storage_bucket in json file
{
  "project_info": {
    "project_number": "263738xxxxxx",
    "firebase_url": "https://msdk-xxxx.firebaseio.com",
    "storage_bucket": "msdk-xxxx.appspot.com"
  }
}
(2)App-related configuration
google_app_id is string, which corresponds to mobilesdk_app_id in json file
google_api_key and google_crash_reporting_api_key are the same and are string, which correspond to current_key in json file
default_web_client_id is string, which corresponds to client_id in json file
"client": [
{
  "client_info": {
    "mobilesdk_app_id": "1: 263738xxxxxx: android: cc76b90af5xxxxxx"
  },
  "api_key": [
    {
      "current_key": "AIzaSyCmNTRpx-0B5TEFFMxxxxxxxxxxxxxx"
    }
  ],
  "services": {
    "appinvite_service": {
      "status": 2,
      "other_platform_oauth_client": [
        {
          "client_id":"263738xxxxxx-vjemk2j6amh7irxxxxxxxxxxxx.appsgoogleusercontentcom",
          "client_type": 3
        }
...
2.2 Modify the Third-party Dependency Library's AndroidManifest.xml and Modify the Package Name of App
Modify the package name of app in AndroidManifest.xml configuration file in Firebase-common-9.4.0 project directory
<provider
 android: authorities="${applicationId}.firebaseinitprovider"
 android: name=".provider.FirebaseInitProvider"
 android: exported="false"
 android: initOrder="100" />
[info]
${applicationId}needs to be modified into the package name of appModify the package name of app in AndroidManifest.xml configuration file in firebase-iid-9.4.0 project directory
<permission android: name="${applicationId}.permission.C2D_MESSAGE"
  android: protectionLevel="signature" />
<uses-permission android: name="${applicationId}.permission.C2D_MESSAGE" />
<receiver
  android: name="com.google.firebase.iid.FirebaseInstanceIdReceiver"
  android: exported="true"
  android: permission="com.google.android.c2dm.permission.SEND" >
  <intent-filter>
      <action android:name="com.google.android.c2dm.intent.RECEIVE" />
      <action android:name="com.google.android.c2dm.intent.REGISTRATION" />
      <category android:name="${applicationId}" />
  </intent-filter>
</receiver>
[info]
${applicationId}needs to be modified into the package name of app
2.3 [Optional] [Recommended] Implement Cloud Message Service Interface
[info] Precaution By default, notifications are only received when the app is in background. If the app is in the front, it needs to implement FirebaseMessagingService to receive messages.
If app wants to receive FireBase push messages while it is running, it needs to implement FirebaseMessagingService service.
The main steps are as follows:
- Create a new Android Library project, whose package name is consistent with the package name of app
Implement FirebaseMessagingService interface
class MyFirebaseMessagingService extends FirebaseMessagingService {
 @Override
 public void onMessageReceived (RemoteMessage remoteMessage)  {
   // TODO
 }
}
Compile jar package, and add it to Unity Assets/Plugins/Android/libs directory
Modify AndroidManifest.xml configuration file
<service android:name=".MyFirebaseMessagingService">
   <intent-filter>
       <action android:name="com.google.firebase.MESSAGING_EVENT"/>
   </intent-filter>
</service>
For more information, please refer to Google reference documentation https://firebase.google.com/docs/cloud-messaging/android/receive
2.4 [Optional] Configure the Icon and Color of the Default Notification Bar
Setup default notification bar's icon
When you push a message, if you specify an icon, the icon is used as the default icon:
<!-- Set custom default icon. This is used when no icon is set for incoming notification messages.
    See README(https://goo.gl/l4GJaQ) for more. -->
<meta-data
  android:name="com.google.firebase.messaging.default_notification_icon"
  android:resource="@drawable/ic_stat_ic_notification" />
[info] drawable can be placed under Android project directory under Unity's Assets/Plugins/Android/ directory, such as: xxx/res/drawable
Setup default notification bar's background color
When a message is pushed, if no message color is specified, the color is used as the default color
<!-- Set color used with incoming notification messages. This is used when no color is set for the incoming
  notification message. See README(https://goo.gl/6BKBk7) for more.-->
<meta-data
   android:name="com.google.firebase.messaging.default_notification_color"
   android:resource="@color/colorAccent" />
[info] color can be placed in the resource file under Android project directory under Unity's Assets/Plugins/Android/ directory, such as: in xxx/res/values/colors.xml file
III. iOS Project Configuration
3.1 Handle FireBase plist File
Add configuration file GoogleService-info.plist to Xcode project
- Unity project: Replace GoogleService-info.plist file under the Plugins/iOS/GCloudSDK/MSDKFirebase/ThirdSDK path

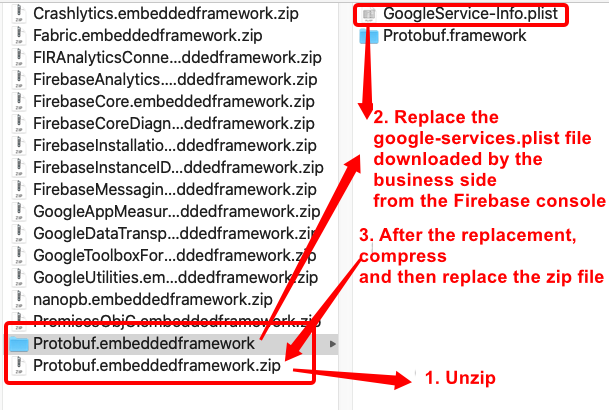
- UnrealEngine project: Replace GoogleService-info.plist file under the MSDKFirebase/Source/MSDKFirebase/lib/iOS/Third/MSDKFirebase/Protobuf.embeddedframework.zip path
3.2 Open Xcode Push
When compiling the code with Xcode 8 and higher versions, open Capabilites/Push Notification function
3.3 System Library Dependency
- Add the following system library:
- UserNotification.framework
- StoreKit.framework
- AdSupport.framework (it is recommended to add Firebase official documentation)
3.4 Unity XUPoter's xx.projmods File's Configuration
When Unity exports XCode project, it is needed to configure projmods file, making the exported XCode project get the above-mentioned configuration
{
    "group": "MSDKFirebase",
    "libs": [],
    "frameworks": [],
    "files": [
        "Plugins/iOS/MSDKFirebase/ThirdSDK/GoogleService-Info.plist"
    ],
    "folders": [],
    "excludes": [],
    "headerpaths":[],
    "build_settings": {},
    "system_capabilities": {},
    "Info.plist": {},
}
IV. Function Description
4.1 Push Function
4.1.1 TAG Function
[info] Precaution
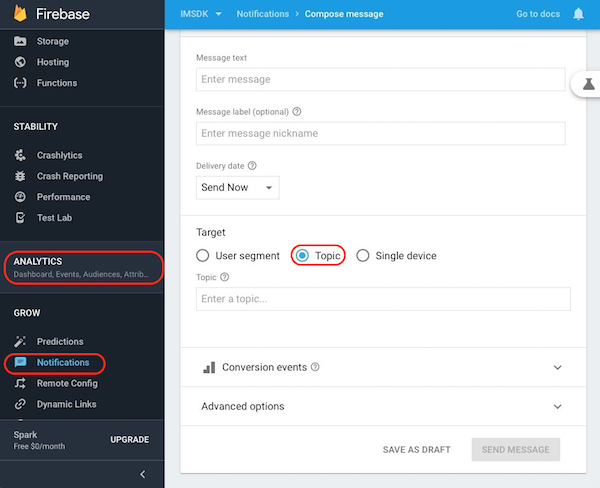
The tag in the Push module of MSDK is the topic function of Firebase
TAG (topic) function is to make tags for users. App can perform corresponding activity functions according to operational requirements
The topic field's definition needs to meet the following conditions: [a-zA-Z0-9-.~%]{1,900}, that is: a combination of characters such as uppercase and lowercase letters, numbers, horizontal lines "-", and underscores "".
Best practices:
Mark the user as a paid user when the user first purchases the coupon:
MSDKPush.SetTag("paid");Push messages to paid users in FireBase backend
[Warning] Precaution
Due to network or system anomalies, it is not guaranteed that TAG is 100% correct
2) Local push function
[warning] MSDK has added Android local push function since V5.30.001.
Local push can be added when the game is not running. Users can click on Push to launch the specified activity. If no activity is specified, the default mainActivity will be launched
Support message display and the message-clicking callback. Please ensure that you have registered relevant callbacks according to the guidelines: Register Callbacks.
Instructions for use:
- To use the Firebase local push function, you need to first register the Firebase channel. Please follow the relevant guidelines Register Push and Cancel Push to register a channel.
- It is needed to set up a notification channel. Please add the following configuration in Androidmanifest
  <meta-data
            android:name="LOCAL_PUSH_CHANNEL"
            android:value="MSDK-Test"
            />
        <meta-data
            android:name="LOCAL_PUSH_CHANNEL_ID"
            android:value="MSDK-Test"
            />
This configuration is suitable for API 26 and above devices. If this field is not configured, the default notification channel name for APP in API 26 and above devices is MSDK-Firebase. For more information on notification channels, please refer to the official Android document: Create and Manage Notification Channels.
- If it is needed to receive push messages normally when the process is killed, the APP developer needs to guide users to enable the self-start permission of APP. Different smartphone vendors have different ROMs and corresponding functional pages are also different, so adaptation needs to be made for different smartphone vendors.
4.2 Statistics Function
4.2.1 Enable the Debug Mode
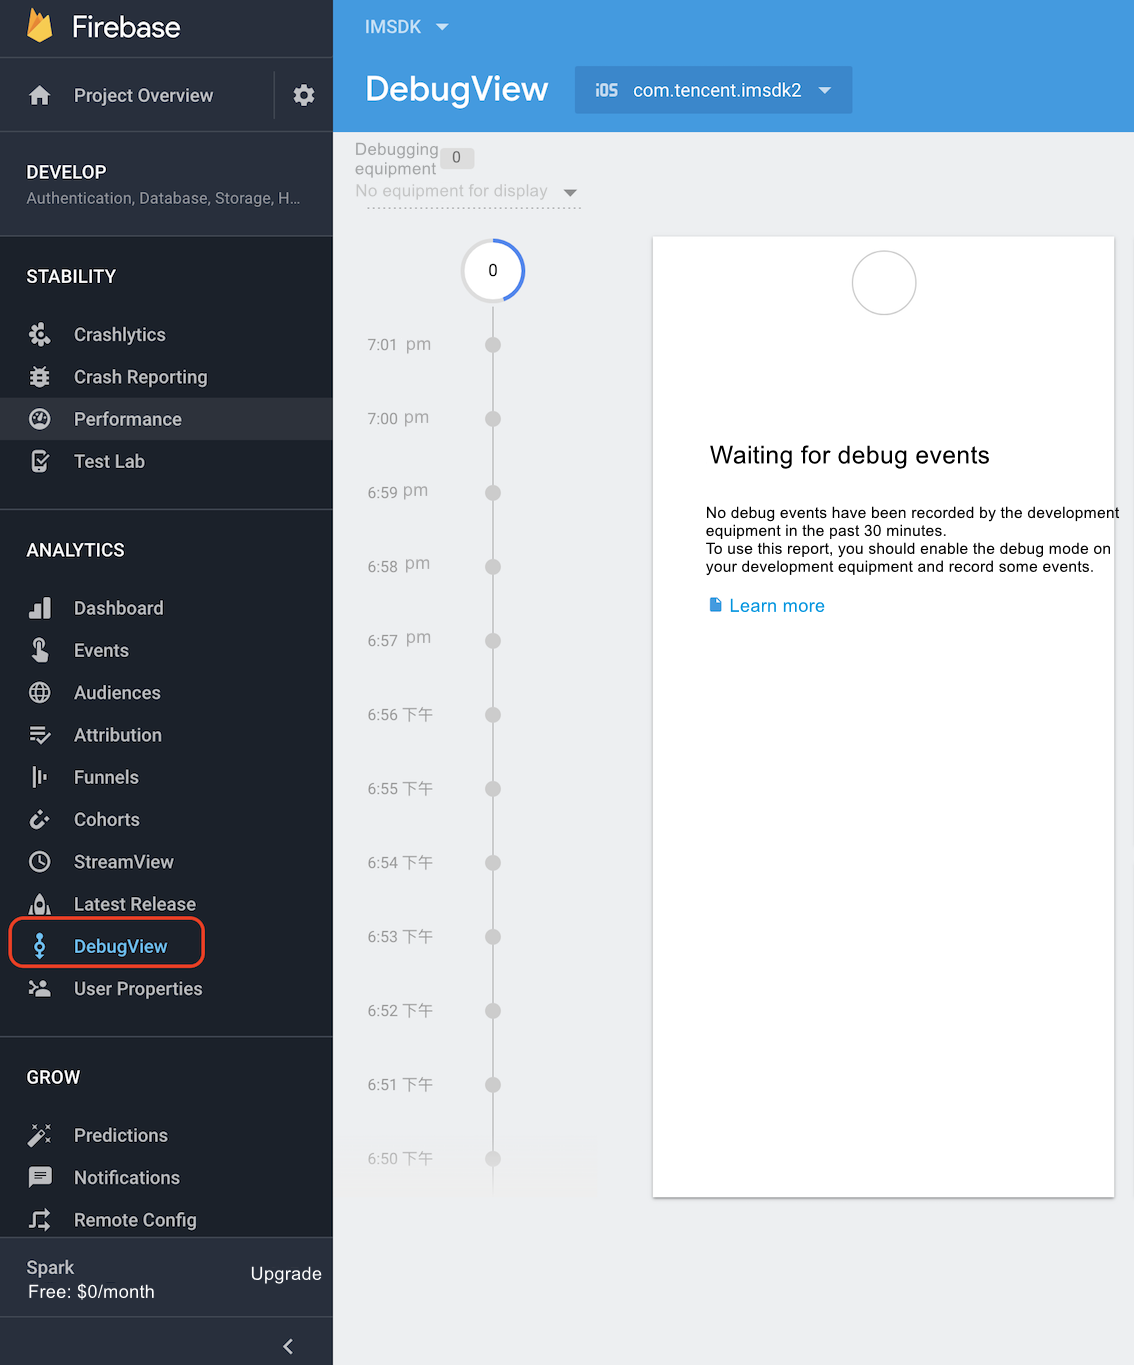
Typically, events recorded by Firebase are aggregated every 1 hour or so and are processed as a batch and uploaded together. This approach can save the battery power of the end-user device and reduce network traffic consumption. However, in order to verify event reporting situation, the Debug mode can be enabled on the development device to upload events with minimal delay. Please refer to Firebase Enabled Debug Mode
If you want to enable Analytics Debug mode on the Android simulation device, please execute the following command line:
adb shell setprop debug.firebase.analytics.app {package_name}
The Debug mode remains enabled until you explicitly deactivate the Debug mode through the following command line:
adb shell setprop debug.firebase.analytics.app .none.
If you want to view the event in Xcode debug console, please enable Analytics Debug mode:
- In Xcode, select Product > Scheme > Edit scheme... in order
- Select Run from the left menu.
- Select Arguments tab.
- In Arguments Passed On Launch section, add
-FIRAnalyticsDebugEnabled.
- View report
After enabling Debug mode on the development device, go to Firebase console
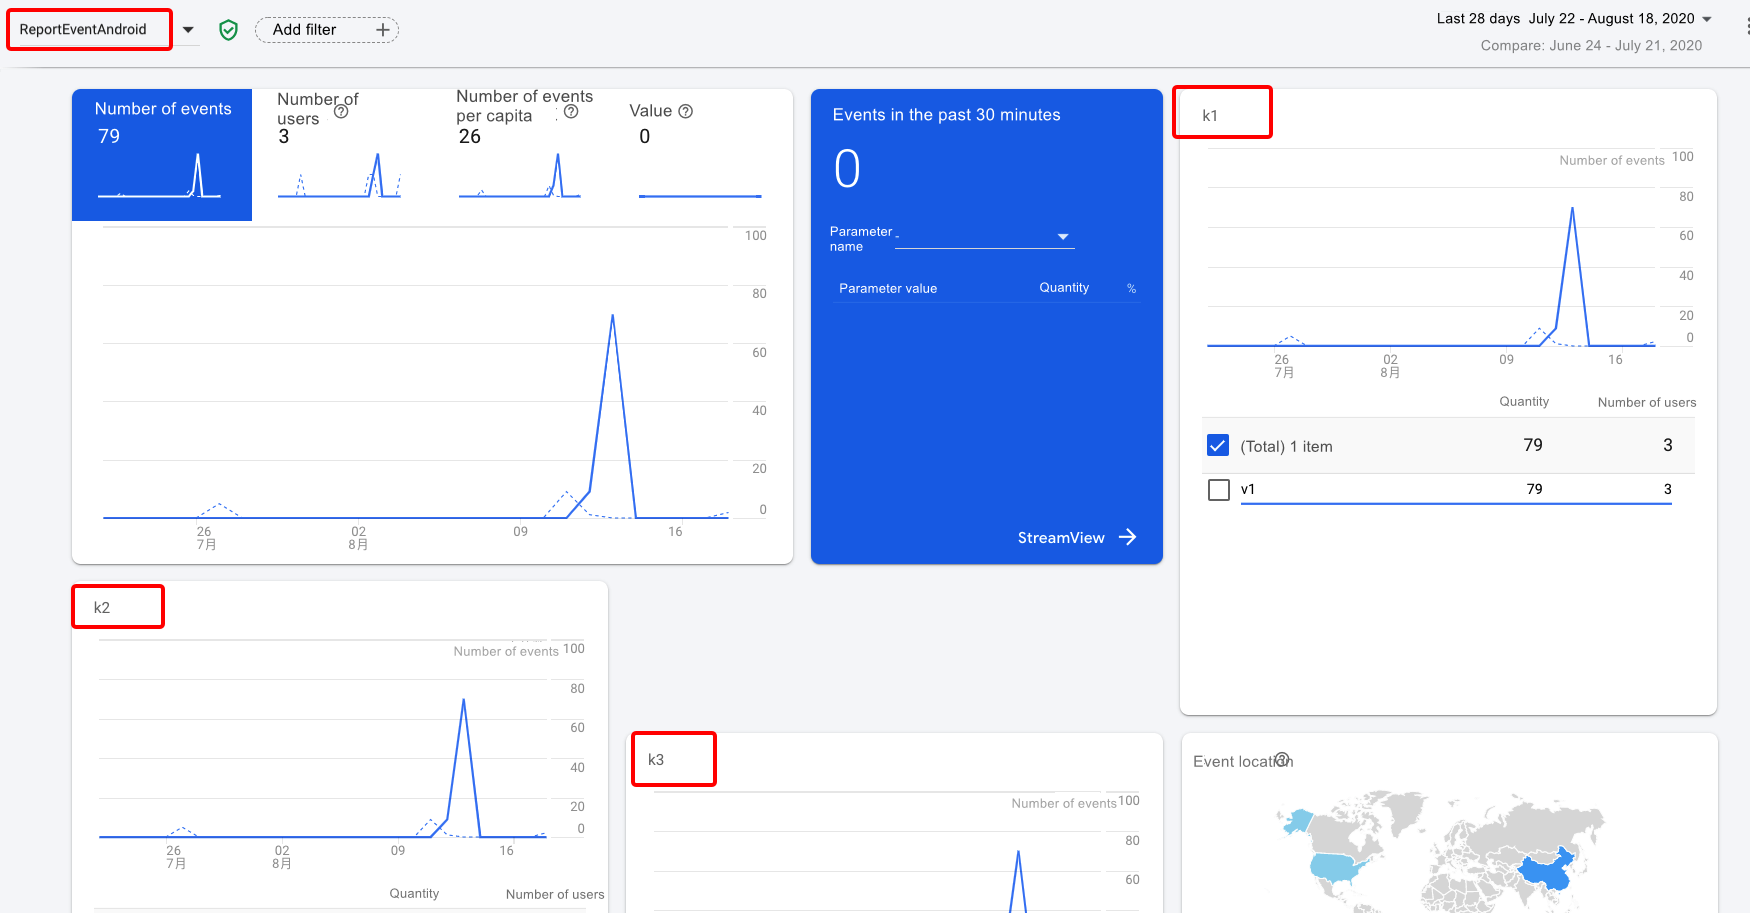
4.2.2 View Report Events
Please go to Firebase Console
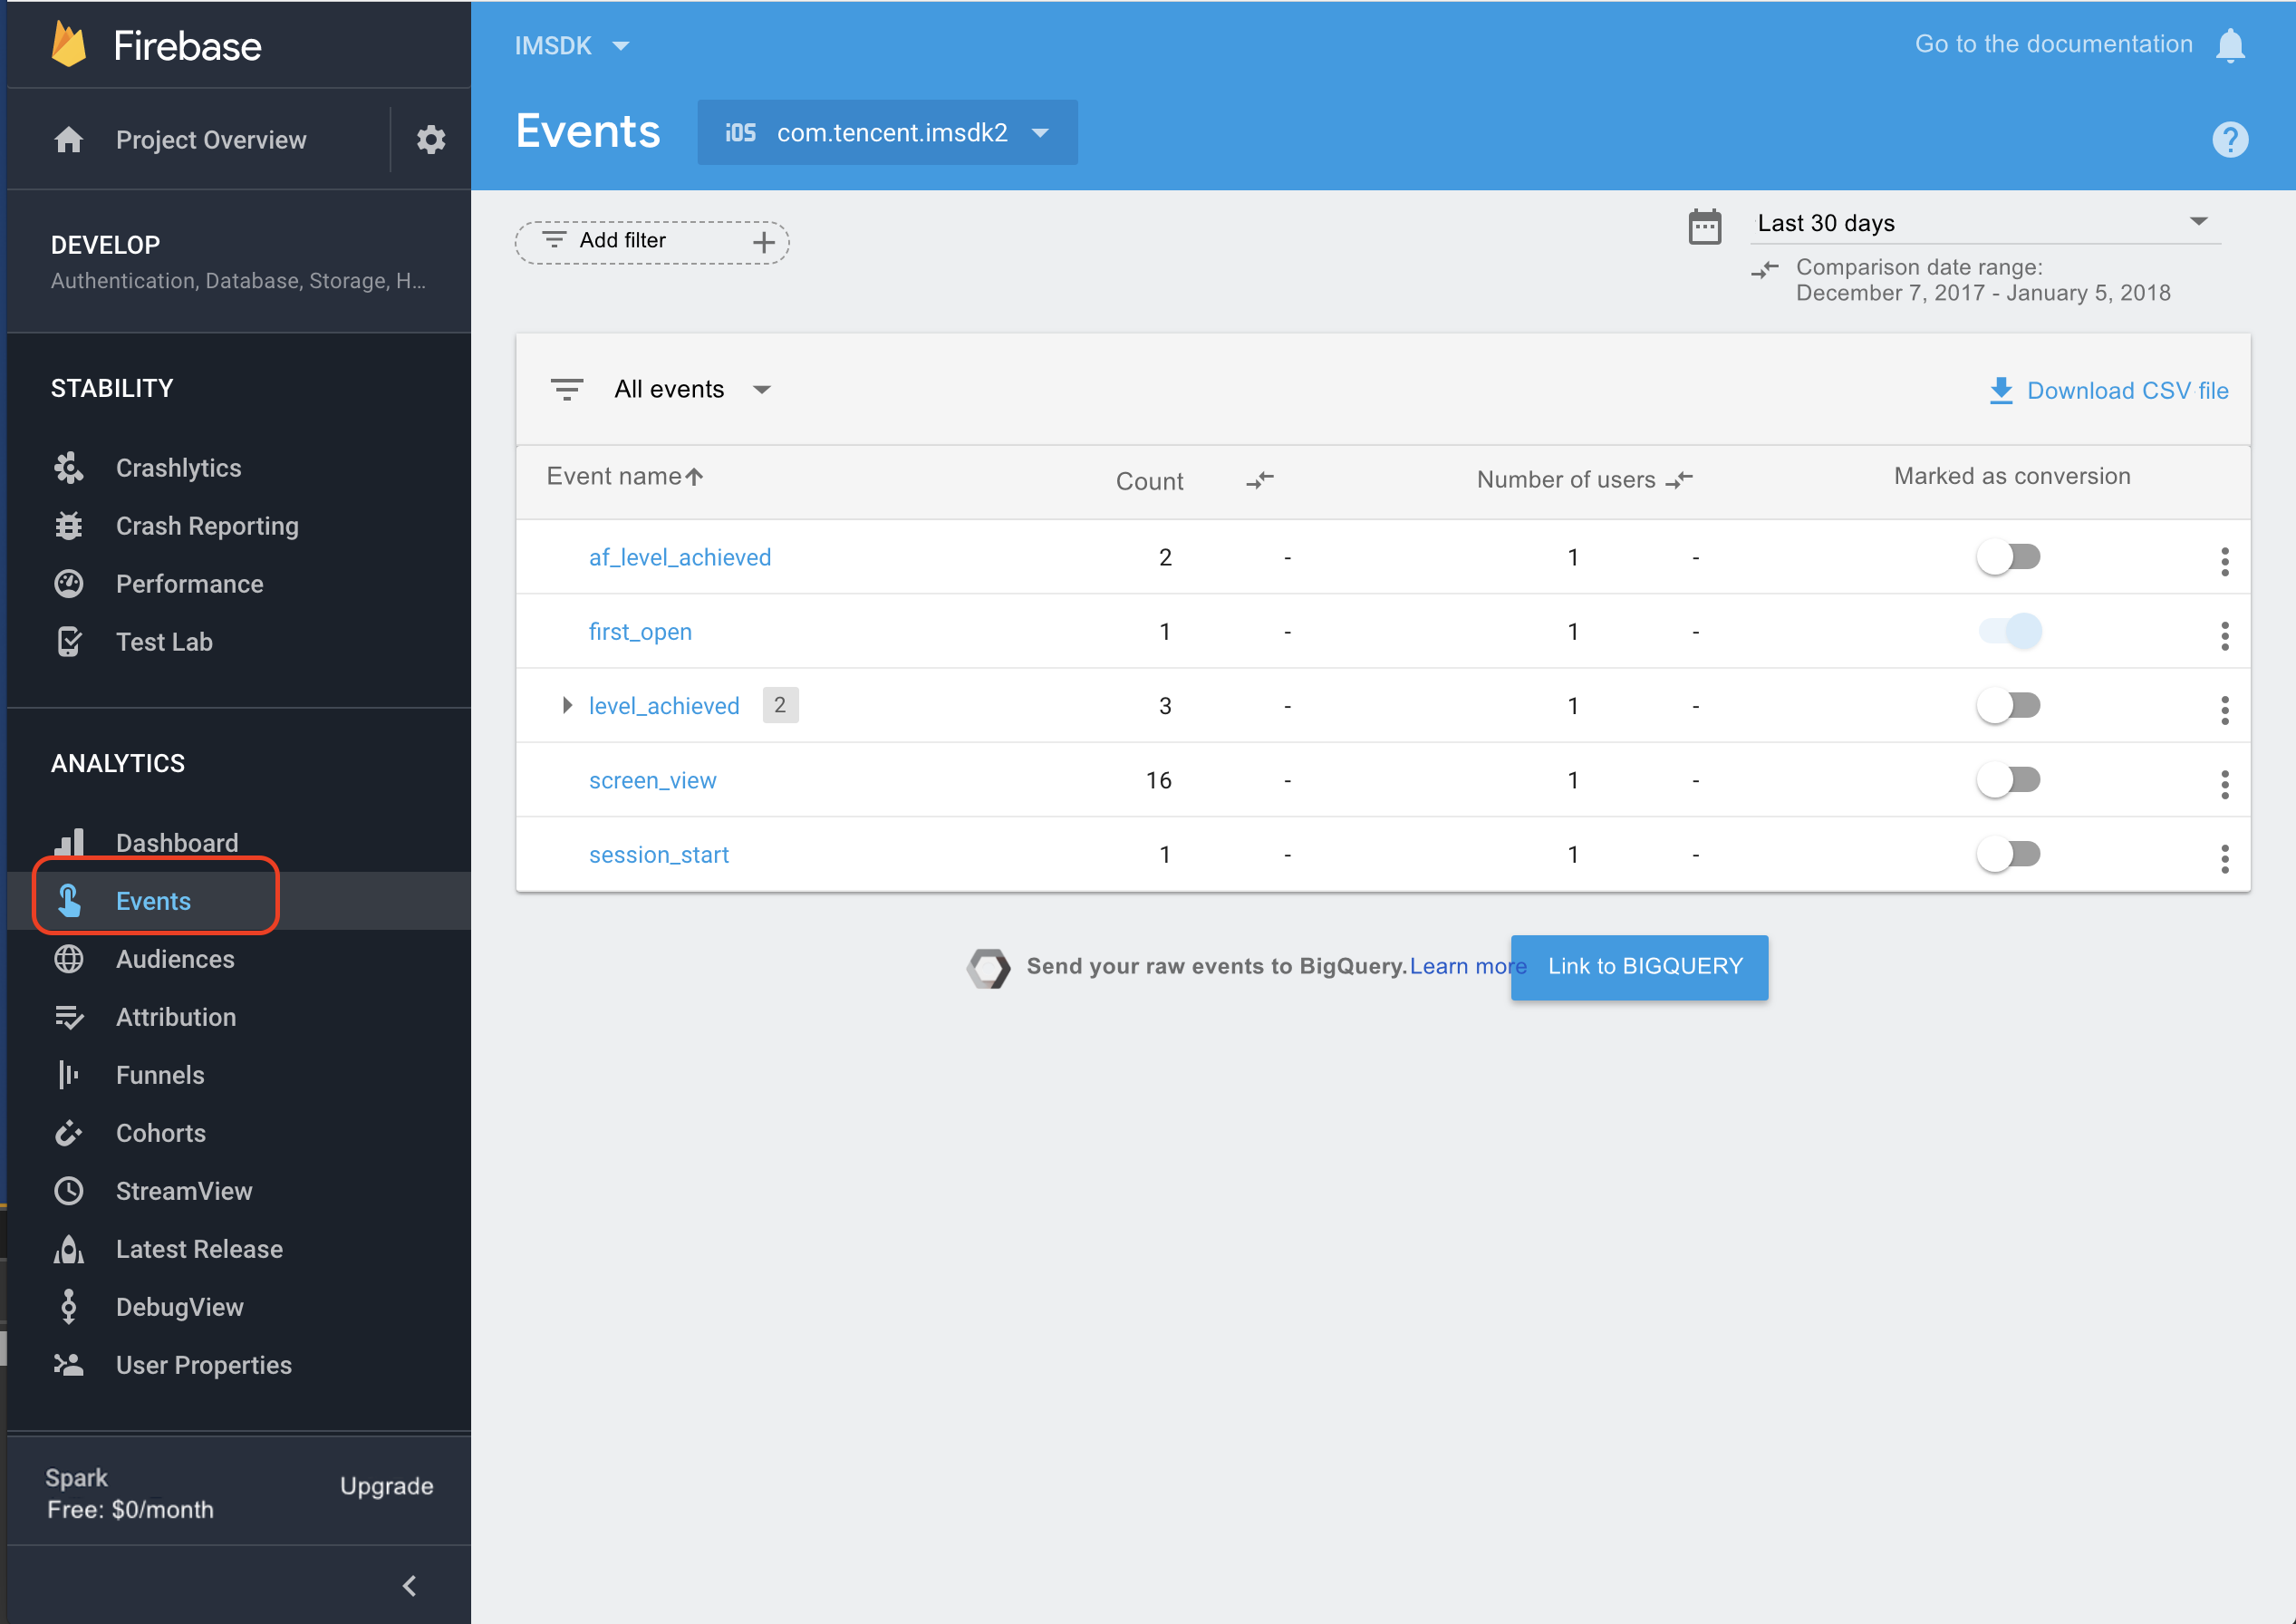
In the reporting event, the user-defined key-value parameter needs to the game to go to Firebase Management to register it in the corresponding event.
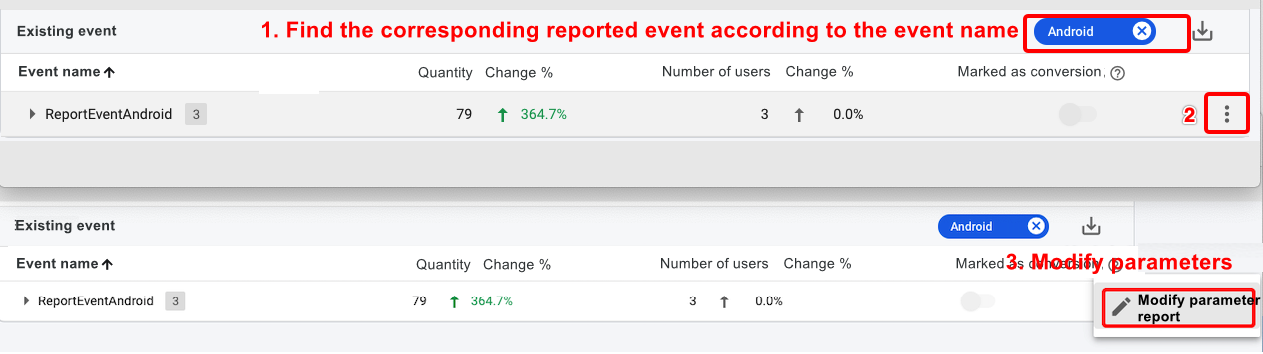
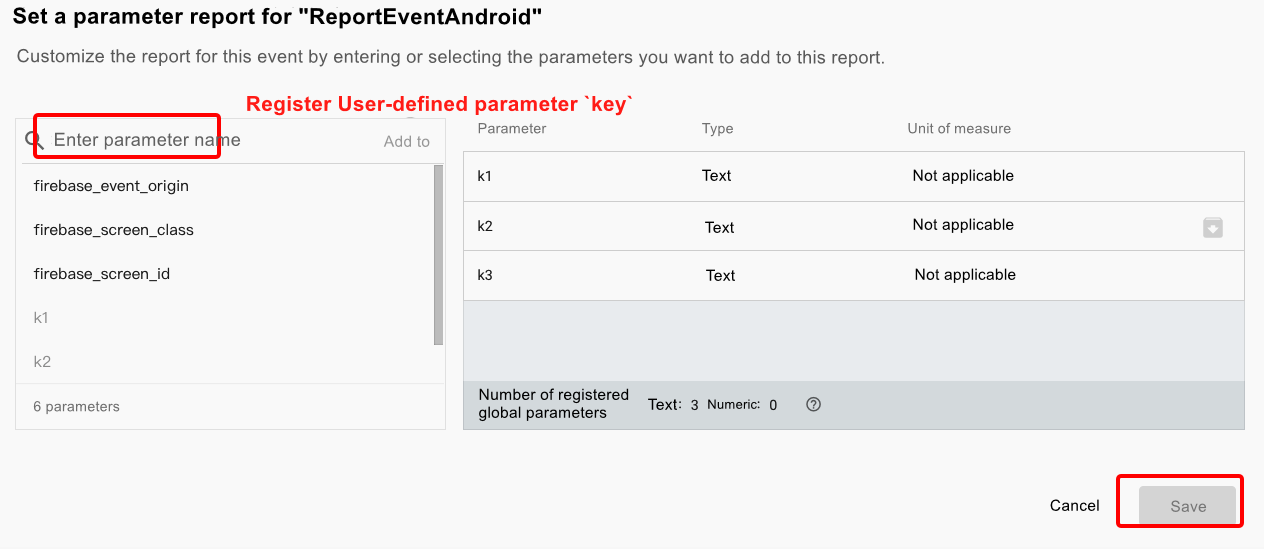
After the user-defined parameter is successfully registered, the display effect is as follows:
4.2.3 Manage user consent settings
Note: This feature depends on MSDK Firebase 5.35.000. The V2 version requires Firebase Analysic 21.5.0 (Android, requires Android Target API 33+)\10.17.0 (iOS) and above! ! !If a developer maintains Google Analytics for their app and wants to integrate consent mode, please see this page: https://developers.google.com/tag-platform/security/guides/app-consent?platform=android&hl=zh-cn#upgrade-consent-v2
Configure default configuration
Please refer to Google documentation for configuration (note: check the English version, the Chinese translation version information lags behind)
-
Android needs to be configured in the AndroidManifest.xml file of the application, reference configuration (business needs to adjust according to its own situation):
<meta-data android:name="google_analytics_default_allow_analytics_storage" android:value="true" />
<meta-data android:name="google_analytics_default_allow_ad_storage" android:value="true" />
<meta-data android:name="google_analytics_default_allow_ad_user_data" android:value="false" />
<meta-data android:name="google_analytics_default_allow_ad_personalization_signals" android:value="false" />
iOS : https://developers.google.com/tag-platform/security/guides/app-consent?platform=ios#initial_setup
iOS needs to be configured in the application's Plist file, reference configuration (business needs to be adjusted according to its own situation):
<key>GOOGLE_ANALYTICS_DEFAULT_ALLOW_ANALYTICS_STORAGE</key> <true/>
<key>GOOGLE_ANALYTICS_DEFAULT_ALLOW_AD_STORAGE</key> <true/>
<key>GOOGLE_ANALYTICS_DEFAULT_ALLOW_AD_USER_DATA</key> <false/>
<key>GOOGLE_ANALYTICS_DEFAULT_ALLOW_AD_PERSONALIZATION_SIGNALS</key> <false/>
-
Adjust configuration using code
MSDK provides extended API for managing User Consent
C#C++string userConsent = "{\"ad_storage\":true,\"analytics_storage\":true,\"ad_user_data\":false,\"ad_personalization\":false}"; MSDKExtend::Invoke("Firebase" "setUserConsent", userConsent);string userConsent = "{\"ad_storage\":true,\"analytics_storage\":true,\"ad_user_data\":false,\"ad_personalization\":false}"; MSDKExtend::Invoke("Firebase" "setUserConsent", userConsent);Among them, the key value of the extended JSON parameter is Consent Type
4.3 Crash exception reporting function
1) Overview
Firebase Crashlytics is a lightweight real-time crash reporting solution that can help you track stability issues that affect your app quality, and prioritize problems and then fix them. Crashlytics can intelligently group crashes and highlight environmental factors that cause these crashes, thus saving your time in troubleshooting.
You can find out whether a particular crash can affect many users. You will receive alerts when a problem suddenly becomes serious. You can find out which lines of code caused the crash.
2) Introduction to reported information
Register the project on the Firebase console page, follow the prompts to complete the Firebase project registration, and add the Firebase application of the corresponding platform on the Firebase console homepage (Project Overview), and view the crash report in Quality->Crashlytics.

1)Report the stack of the crash process, as shown in the figure below:

2)Report the basic information of the current mobile phone, including device name (manufacturer, model), system version, available storage space, available memory size, etc.;
3)Report the user's openid, as shown in "User" in the figure below. The default reported User ID is MSDK openid. Setting user- defined User ID is also supported.

4)User-defined reported information
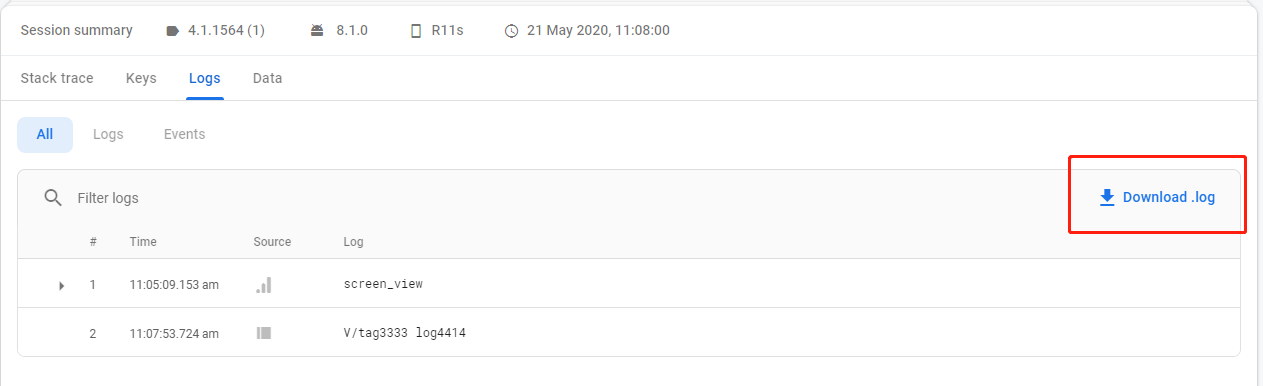
A. You can set key-value pair for key data, and report the data with crash information. You can view the data in Keys, as shown in the figure below :

B. User-defined log (custom log messages) Download and view the log in Logs, as shown in the following figure:
V. FAQ
5.1 Common compilation problems
1, In MSDK 5.3.000, upgrade Firebase version to the official version 6.1.0, and add Crash reporting function. (Firebase requires Unity 5.3 or higher versions. Under Unity4.x, Firebase in the project may cause the failure to open the project.);
2, Unity2017 and later versions support dotnet4. The game can choose dotnet3 or dotnet4 according to its own situation, and copy the directory to asserts/CloudSDK/Scripts.

3, When Unity2018 iOS is packaged, Crashlytics.framework and Fabric.framework may encounter Embedded Binary problems. This is because the plugin package contains some shell running scripts for uploading dYSM files and making other operations. The game can manually deselect Add to Embedded Binaries;

5.2 Firebase dismantle the Crash module
MSDK 5.16 version starts to support the removal of Firebase Crash module on AndroidX and iOS. The game developer can manually remove third-party plugins in the following ways.
1, Unity engine
Android X
1) Delete theGCloudSDK/Scripts/MSDKFirebasefolder in the whole package;
2) Delete thePlugins/Android/gcloudsdk-firebase-app-unity-6.16.1(version number may be changed) folder in the whole package;
3) Deletecompile "com.google.firebase: firebase-crashlytics: 17.2.2"(the version number may be changed) in theplugins/Android/gcloudsdk-msdk-firebase/additions.gradlefile in the whole package .iOS
1) Delete theGCloudSDK/Scripts/MSDKFirebasefolder in the whole package;
2) Delete thePlugins/iOS/GCloudSDK/MSDKFirebase/ThirdSDK/FirebaseCrashlytics.frameworkfile in the whole package;
3) Delete thePlugins/iOS/GCloudSDK/MSDKFirebase/Firebasefolder in the entire package.
2, UE engine
- Android X
1) Deletecompile "com.google.firebase:firebase-crashlytics:17.2.2"(the version number may be changed) in theMSDKFirebase/Source/MSDKFirebase/lib/Android/msdk-firebase/additions.gradlefile in the whole package .
2) Delete the following content in theMSDKFirebase/Source/MSDKFirebase/MSDKFirebase.Build.csfile in the entire package.#if UE_4_22_OR_LATER PublicAdditionalFrameworks.Add(new Framework("FIRAnalyticsConnector", "lib/iOS/Third/MSDKFirebase/FirebaseCrashlytics.embeddedframework.zip", "")); #else PublicAdditionalFrameworks.Add(new UEBuildFramework("FIRAnalyticsConnector", "lib/iOS/Third/MSDKFirebase/FirebaseCrashlytics.embeddedframework.zip", "")); #endif - iOS
1) Delete theMSDKFirebase/Source/MSDKFirebase/lib/iOS/Third/MSDKFirebase/FirebaseCrashlytics.frameworkfile in the entire package;
2) Delete the following content in theMSDKFirebase/Source/MSDKFirebase/MSDKFirebase.Build.csfile in the entire package.
#if UE_4_22_OR_LATER
  PublicAdditionalFrameworks.Add(new Framework("FIRAnalyticsConnector", "lib/iOS/Third/MSDKFirebase/FirebaseCrashlytics.embeddedframework.zip", ""));
#else
  PublicAdditionalFrameworks.Add(new UEBuildFramework("FIRAnalyticsConnector", "lib/iOS/Third/MSDKFirebase/FirebaseCrashlytics.embeddedframework.zip", ""));
#endif
All rights reserved.